Chris Schwartz
In the fast-paced software development space, DevOps and test automation are levers for achieving faster delivery and enhancing overall quality.
This guide provides a closer look at DevOps test automation, outlining key strategies and answering frequently asked questions.
Skip ahead to:
What is test automation?
What is DevOps?
DevOps and test automation
The benefits of automated testing in DevOps
Building a DevOps test automation strategy
Selecting DevOps automated testing tools
DevOps automated testing FAQ
Keep learning about DevOps test automation
What is test automation?
Test automation refers to the use of software to control the execution of tests, compare the outcomes to predicted results, and measure the performance of software applications.
In essence, it's about automating the mundane and repetitive tasks in the software testing process to increase efficiency and test coverage.
To learn more about test automation, check out our article: What is test automation?
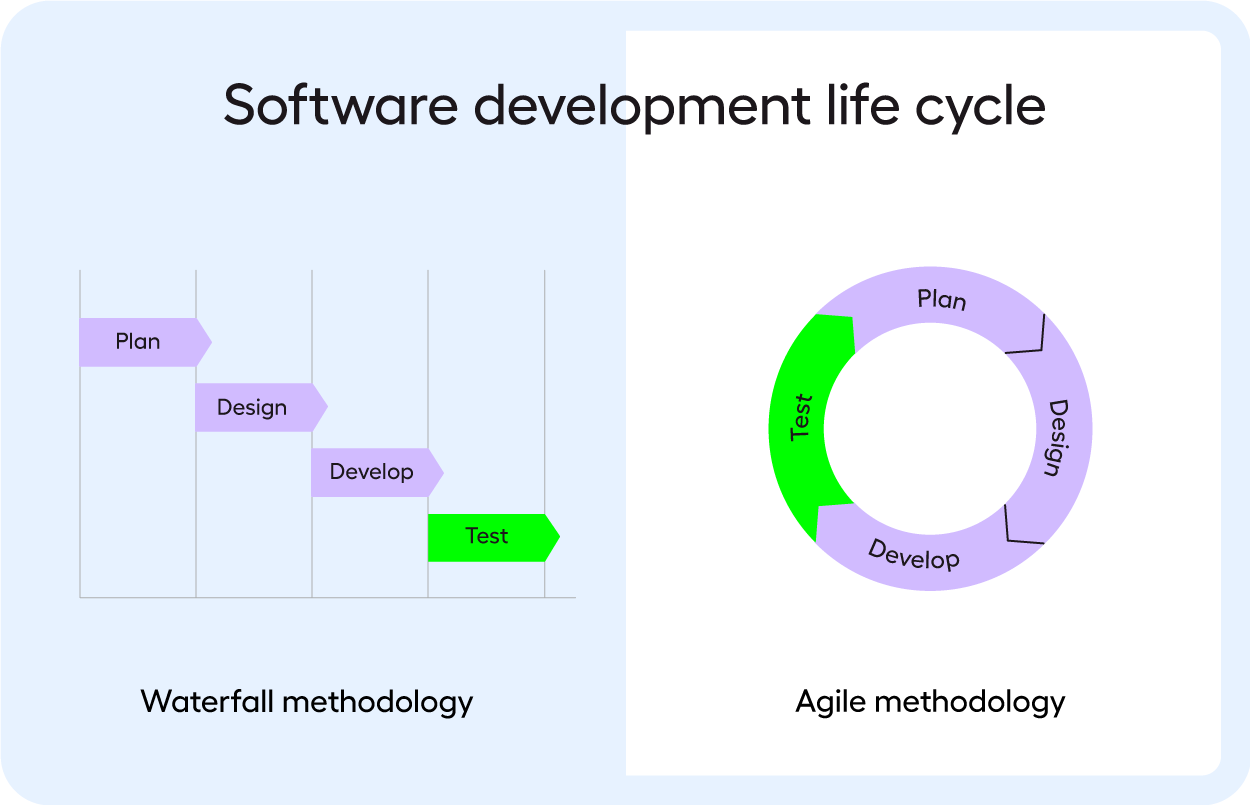
What is DevOps?
DevOps is the integration of development (Dev) and operations (Ops), embodying a culture, movement, or methodology that promotes collaboration between software development and IT operations teams.
It aims to shorten the development lifecycle, enhance deployment frequency, and achieve a high degree of software quality through continuous integration and continuous delivery (CI/CD). Central to CI/CD is continuous testing, which accelerates feedback loops, and ensures rapid, high-quality releases. You can see how continuous testing fits into CI/CD below.
To learn more about DevOps, check out our article: What is DevOps?
DevOps and test automation
Test automation plays a pivotal role in the DevOps ecosystem. It fundamentally transforms the testing process within DevOps, automating routine and repetitive tasks to boost efficiency and expand test coverage.
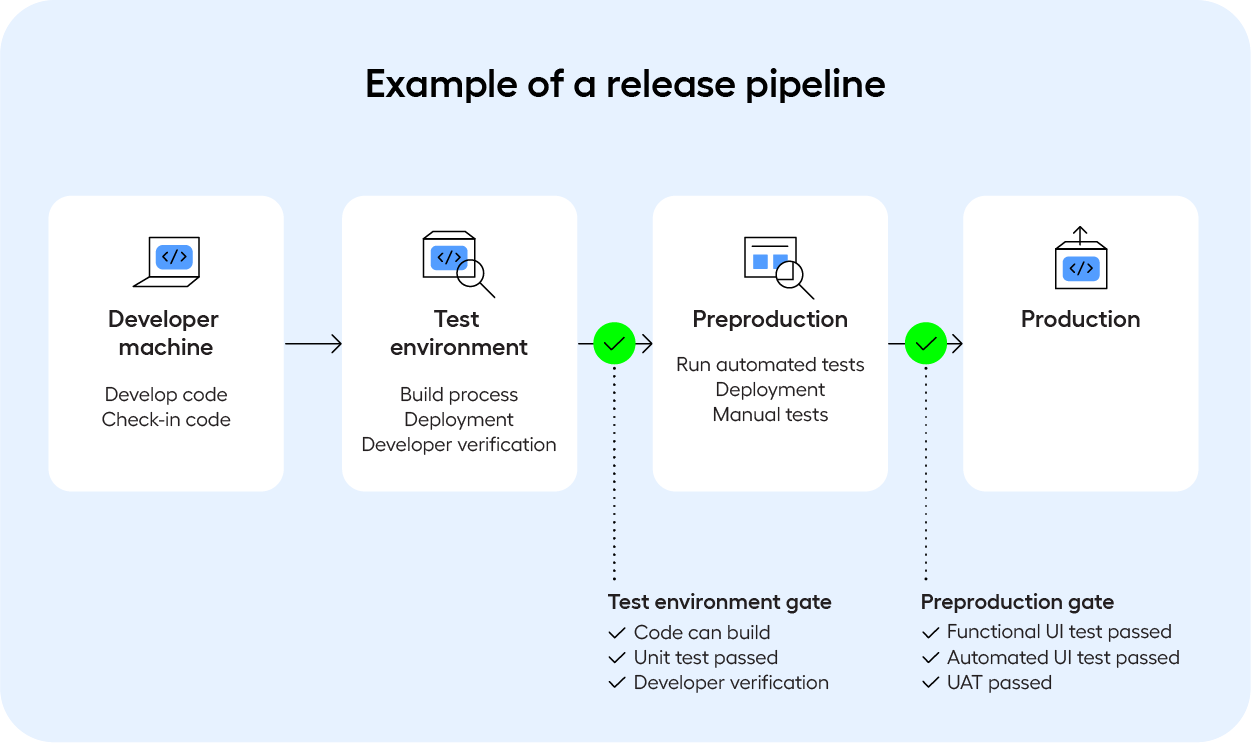
Integrating test automation within DevOps practices lays the foundation for a seamless and continuous development, testing, and deployment pipeline. This integration accelerates the release cycle and ensures that quality is baked into your software and processes. The image below shows how test automation fits into a DevOps release pipeline.
The benefits of automated testing in DevOps
Integrating automated testing into DevOps processes not only optimizes operations, but also elevates product quality, reliability, and performance. Here are the primary benefits of adopting test automation:
- Accelerated feedback loops: Automated testing in DevOps environments facilitates rapid feedback on code changes, enabling teams to address issues promptly and improve quality.
- More efficiency: Automation reduces the manual effort required in testing, allowing teams to focus on more critical tasks and innovation.
- Increased deployment frequency: With automated tests, teams can confidently deploy more frequently, ensuring that new features and fixes reach customers faster.
- Improved reliability: Automated tests are repeatable and can be run at any time, reducing the likelihood of human error and increasing the reliability of the test results.
- Scalability: Test automation makes it easier to scale testing efforts alongside the growth of the software application and infrastructure.
Building a DevOps test automation strategy
A solid test automation strategy stands as a crucial pillar for successful software testing, particularly within the DevOps framework. Without a strategic approach to automated testing, you are likely to encounter challenges that can hinder both development and testing phases.
Developing a comprehensive test automation strategy involves the following steps:
- Define clear goals and metrics: Understand what you aim to achieve with automation and how you will measure success.
- Select the right tools: Choose tools that integrate well with your DevOps pipeline and support your technology stack. See more on this in the next section.
- Prioritize tests for automation: Not all tests should be automated. Prioritize based on the potential return on investment.
- Define roles and responsibilities: Designate the roles of team members, such as Automation Lead and Automation Architect. Define processes for developing automated test cases, maintaining them, and analyzing results.
- Integrate early and often: Integrate testing early in the development lifecycle and ensure it's a continuous part of the process.
- Monitor and optimize: Regularly review the effectiveness of your testing efforts and optimize as necessary.
For a more in-depth strategic document on implementing test automation in DevOps, download our Test Automation Strategy Checklist.

Selecting DevOps automated testing tools
Choosing the right test automation tools will define the success of your DevOps test automation strategy. Consider the following factors:
- Compatibility: Ensure the tools are compatible with your existing development and deployment environment.
- Ease of Use: Look for tools that are user-friendly and reduce the learning curve for your team. Codeless test automation tools tend to be the easiest to use and offer the fastest time to value. If you are looking to get ramped up fast, it might be worth finding a solution with a professional services team.
- Scalability: Tools should be able to scale as your testing requirements grow.
- Integration Capabilities: Seamless integration with other tools in the DevOps pipeline is crucial.
- End-to-End Capabilities: Ability to work across the technologies that you work with to ensure the quality of entire business processes.
- Support and Community: Consider the level of support provided and the tool's documentation. If you are testing business-critical processes, it’s worth finding a solution with live support.
Related reading: The Top 20 Test Automation Tools of 2024
DevOps automated testing FAQ
What is DevOps automated testing?
DevOps automated testing refers to the process of executing tests automatically within a DevOps workflow to ensure software quality at every stage of development and deployment.
Is test automation part of DevOps?
Yes, test automation is an integral component of DevOps. It enables continuous testing, which is essential for the continuous integration and delivery pipeline in DevOps practices.
How do you automate testing in the DevOps lifecycle?
Automating testing in the DevOps lifecycle involves integrating automated tests into the CI/CD pipeline, ensuring that tests run automatically whenever code is committed or deployed. It requires selecting appropriate tools, setting up test environments, and maintaining test scripts to align with the continuous development and deployment processes.
Keep learning about DevOps test automation
Embracing DevOps test automation is about more than enhancing efficiency and speed; it's a strategic move toward building a culture of continuous improvement and innovation.
By understanding the principles, benefits, and best practices outlined in this guide, you can navigate the complexities of modern software development and pave the way for a future of accelerated growth and success.
Download our whitepaper to learn how to implement test automation within the release pipeline quickly and easily.