.svg "Leapwork")


Blog
Read the latest blogs

Image and text recognition make up the backbone of automating virtual desktop applications. This article covers some of the basics of working with image and text recognition. We'll also present best practices and solutions for tackling some of the challenges inherent to image and text recognition.
Leapwork comes with two categories of building blocks for automating with image and text recognition:
Image recognition is the "art" of finding one image within another image. Typically you will have one image that is defined at design time (captured into your Leapwork automation flows) and one image which is a screen shot of the actual application when the automation flow is running. What Leapwork will do when the automation flow is running is look for the captured image in the screenshots and act according to the defined flow.
Sign up for webinar: No-code test automation with Leapwork
Technically, image recognition compares a matrix of numbers with another matrix of numbers and returns if the first matrix is part of the second matrix. One of the challenges is that the two matrices can change if the screen resolution changes. E.g. if the automation flow is executed on another machine or the resolution has changed, then the accuracy in finding the captured image in the screenshot can decrease, which can lead to less robust automation flows.
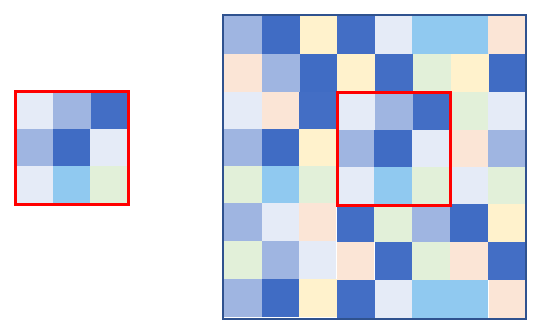 Image recognition looks for an image within an image, or a matrix within a matrix.
Text recognition is based on pattern recognition, which means that Leapwork searches an area on the screen for a pattern that matches letters. Letters can come in different fonts, colors, and sizes, and a text's background can be an image or a gradient pattern which makes it harder to recognize the actual letters and numbers on the screen.
In the following, we'll present best practices for handling common challenges related to working with text and image recognition. The best practices address:
Following these tips will significantly improve the quality of your automation flows that rely on image and text recognition.
The background color behind an icon can change, so don’t include parts of the background when capturing an icon.
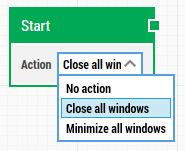
A “hover” effect can change how the icon looks when hovered by a mouse pointer, for instance showing a brighter or darker version. This can usually be handled by closing all open windows as part of the test run, by setting the 'Action' property on the Start building block to "Close all windows".
A “selected” or “opened” effect can change how the icon looks when selected. For instance, a Chrome icon in the Windows task bar looks different before Chrome is opened compared to when browser instances are already open. This can typically be solved by using the Image collection feature (see later).
No browsers open:![]()
At least one browser open: ![]()
One situation that can occur for all types of applications is that an image is shown first in one place and is then moved to another. For example, on some websites all resources are first loaded into the page and are then "boot-strapped" into position. Another example could be a dialog box in a desktop application that is shown and then centered on the screen.
In both cases, Leapwork can find the image in the initial position and then continue the test flow. However, if the image changes position as part of the application the automation flow will fail.
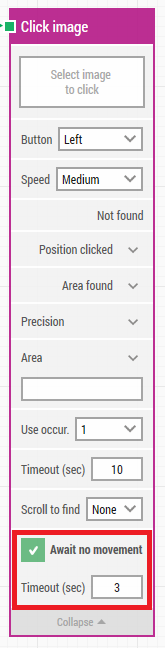
Checking the “Await no movement” property on the Click image building block solves this problem. This will tell the image recognition engine to wait until the screen has not changed for a period of time before starting to search for the image.
For image recognition - and especially for text recognition - it is best practice and highly recommended to use "Areas". An "Area" is a sub-section of the entire screen and is used to tell the image/text recognition engine to limit its search for the captured image or a specific text/text pattern in the specified area. Typically you will define an area at the part of the screen where you expect the image or text to appear, including some margin.
Specifying an area has two main purposes:
More information about using and defining areas.
The Image Collection feature allows you to capture two or more images into a collection and then use the collection when searching for an image. This means, for example, that you can capture the same button in different states (no focus, in focus, hovered, pressed etc.), add all the captured images into one collection, and then just have the automation flow click or find the button regardless of the state of the button. This increases the robustness and the tolerance for changes in a flow.
In the example below we have captured the search button - "Go" - from a Windows desktop application.

The button can have four different looks depending on focus and hover effect:

All four states have been captured, and the images are now located as resources under the flow in the asset menu:
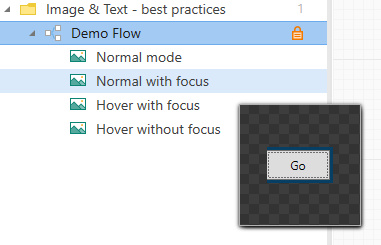
In the example above, the images are renamed to make it easier to identify the images. Hovering an image in the asset menu will popup a thumbnail view of the image.
To create an Image Collection click "New" + "Capture" + "Image collection". This will create a new, empty Image collection in the Asset Menu. It is also possible to simply right-click the folder where the Image Collection should be located in and select "Capture" + "Image Collection".
Image Collections can be identified by this logo in the asset menu:

Once added, it is best practice to rename the image collection to something meaningful to make it easier to maintain and reuse the image collection across multiple flows.
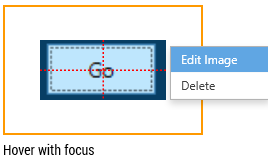
Adding images to an Image Collection is really simple: Just drag-n-drop images from anywhere in the asset menu on top of the image collection. To view the images in the collection, double-click the collection to open the "Edit image collection" dialog.
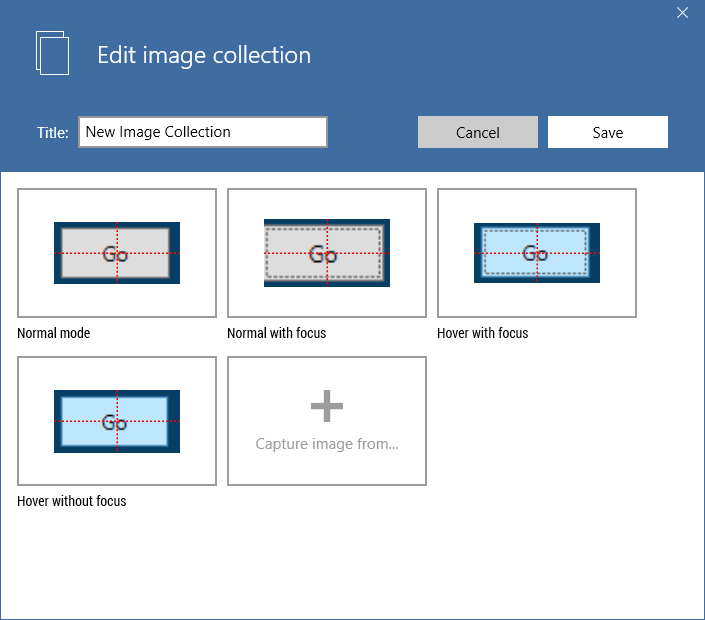
In the dialog it is possible to edit and change the images individually if needed.
You can now use the collection in a building block by dragging the collection onto the image field in the building block:
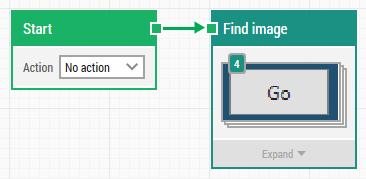
When the Find Image block is executed, it will search the screen for the images in the collection one by one. If it finds one of the images, it will click it and then stop the search and hand over the execution to the next building block in the flow.
The image collection can also be used to handle different resolutions of the same icon/image if you know you will run the same automation flow in different resolutions. It can also be used to handle different states of icons.
The image resources are shared within a project, so the collections can be used in multiple automation flows. This means you can create e.g. a "Chrome icon" collection that contains all relevant states of the Chrome icon in the windows task bar, and then use this collection across all automation flows that operate with Chrome. This comes with the bonus that you only have to maintain the image collection in one place instead of in all the automation flows.
A typical setup of Leapwork consists of a number of workstations with Leapwork Studio installed, a Controller installed on a common/shared server to make sharing easy, and then one or more machines entirely used to execute the automation flows. When automation flows using image and text recognition run, they will interact with the actual screen. This means that if you run image and text recognition on your local machine you can't work on it at the same time. This is the reason for using "remote machines" for running automation flows.
To make your automation flows independent of differences in the screen resolution between machines where the flows can be executed, you can define an Environment pointing to a "remote machine". You can then use the "remote machine" to capture images on instead of your local workstation. This way you will end up capturing images directly on the machine where you will execute the automation flow, securing that the screen resolution is always the same.
To create a "remote machine" you need to install the Leapwork Agent on a dedicated workstation that is accessible from both Leapwork Studio and the Leapwork Controller. Once the remote machine is up and running you can define an Environment in Studio pointing to this machine. You can find more info here.
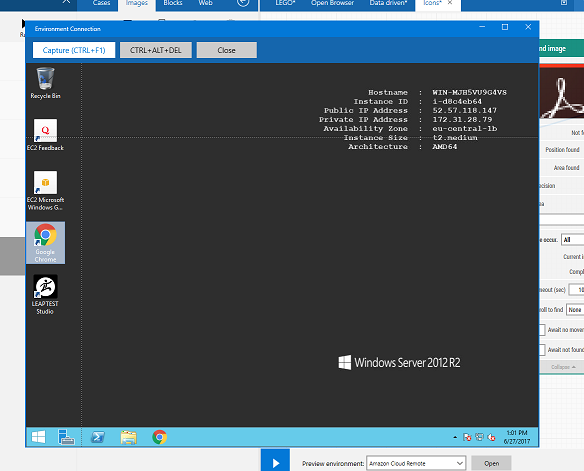
When the environment is created you can select it in the 'Preview environment' on the design canvas. In the example below, "Amazon Cloud Remote" is an environment pointing to a cloud-hosted (Amazon) server where the Leapwork Agent is installed.

When the 'Preview Environment' points to a remote machine, a "terminal" window will popup when you capture new images, allowing you to capture directly on the remote machine instead of on your local machine.
The building blocks using Image recognition have a property named Precision. This configuration is accessible by expanding the building blocks. The Precision property has two sub-properties:
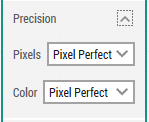
In this section, you can set the accepted level of accuracy for the image recognition. Default is "Pixel perfect" which means that there has to be a perfect match, pixel by pixel, before the captured image is considered found on the screen. In some cases a higher level of tolerance is needed. The advice is to start with 'Pixel Perfect' for both properties and then change them one level at a time until the image recognition works as intended.
For the building blocks using OCR (text recognition), you can change the settings for the OCR engine to optimize how the characters are recognized.
You can choose between two different built-in OCR engines in the building block configurations:
Both "Default" and "Default (new)" are working engines, but because of the different technologies, one engine might be a better fit for some applications. In case the OCR building blocks are not behaving as expected, one option is to try to change to the other engine.
In case the built-in OCR engine in Leapwork is not matching your requirements, it is possible to change the engine to ABBYY.
ABBYY is the world-leading OCR engine, but this requires a separate ABBYY license with. Also be aware that ABBYY itself requires some infrastructure work to be set up, so in most cases the built-in engines is the best option.
Contact our Customer Success Team to get started with ABBYY.
You can choose between two different OCR Modes. In short, it's a choice between speed and quality.
OCR precision sets the accuracy of the OCR results on a character level. This means, a higher OCR precision level requires a higher confidence in the OCR engine before a certain character is matched.
With a high precision you can be very confident that the characters found are the correct characters.
On the other side a high precision can result in some characters are not found. Setting a lower precision means that, in general, more characters are found, but the assurance that it’s the right characters is lower than with a high precision. So, the right setting is a balance between finding all the right characters and not include too much that will pollute the results. The right setting will depend on the font, colors, background, and size of the text.
The precision can be set on a scale from 0 to 100. 0 will return everything that was recognized by the OCR engine and 100 will return the best possible recognized result.
The default Precision Levels are:
Learn more about Leapwork and no-code test automation in our webinar.