Native Mobile installation Guide
Introduction
Leapwork offers the Mobile Automation feature. This feature enables you to run automation on mobile devices.
You can connect to cloud devices alongside native mobile devices to run the flows.
The connection details for cloud devices are explained in the below sections in detail.
Objective
The main objective of this feature is to support mobile automation on both iOS and android devices, the benefits of which are listed below:
- Enables you to execute end to end mobile testing much faster than manual execution methods
- Allows you to run flows on multiple devices
- Provides the option to run flows on physical and on-prem devices
Instructions for Installation
Leapwork supports mobile automation on native devices Appium and HeadSpin. Below are the instructions to install and run mobile automation on Android and iOS devices.
Android Device
Leapwork does not support the installation of Appium and mobile devices. You should have Appium pre-installed. Now, run the latest version of Leapwork platform installer. Upon successful installation, the mobile automation blocks will be ready for use on Android device.
iOS Device
Leapwork does not support the installation of Appium and mobile devices. The client should have Appium pre-installed. Now, run the latest version of Leapwork platform installer. Upon successful installation, the mobile automation blocks will be ready for use on iOS device.
Device Setup and Management in Leapwork Studio
- You can now have the option to connect multiple devices and configure them based on the requirement. Two new tabs Connection and Mobile Configuration which are described below is available under the Settings menu and only Admin can maintain the data under these tabs. So, you should an Admin access to create a connection and configure the device.
- Once the Admin creates a connection and configures a device, the user can choose the desired configuration on which the mobile automation flows can be run.
Connections
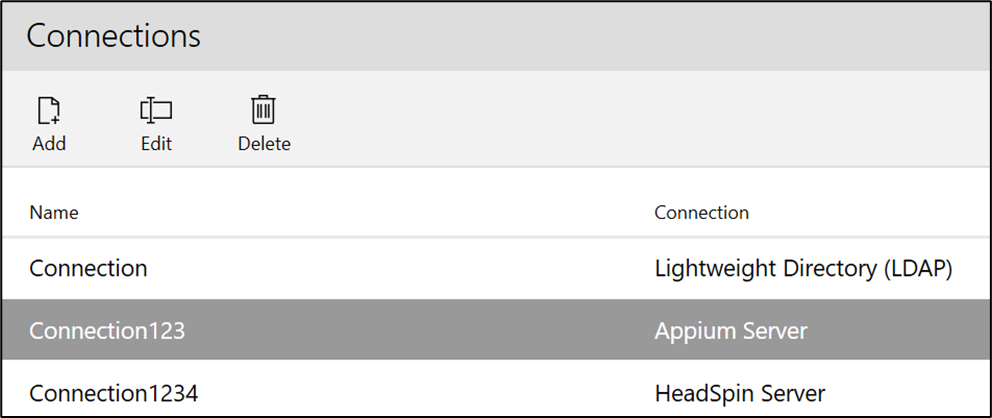
The Connection tab lets you set up a connection to different servers. Multiple connections can be created and saved which can be used for running the flow.
Leapwork Mobile automation supports two different ways to set up a connection:
- Appium Server
- HeadSpin Server
Appium Server
Appium Server is an open-source automation framework that is used for testing mobile applications. It drives Android and iOS app using WebDriver.
Add Connection:
To add a connection, click the Add button and the following pop-up appears:
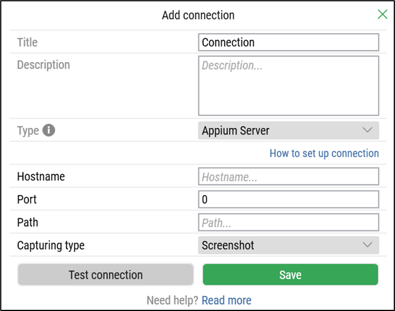
On the Add Connection pop-up window:
Enter the title in the Title field. It should be unique.
Enter the description in the Description field.
From the Type drop-down, select the Appium Server option:
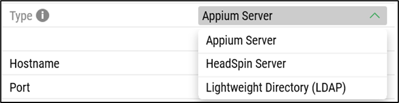
Select Appium Server and the following new fields appear:
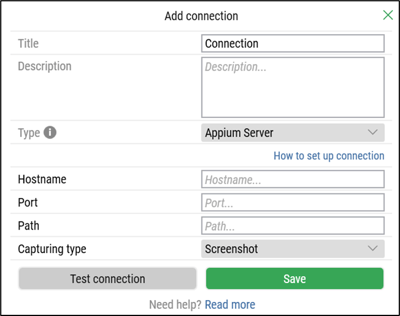
Enter Hostname in the Hostname field.
The Hostname is a ‘localhost’ if the same system is used to configure a mobile device on which Leapwork exists.
The Hostname is a ‘IP address’ (details provided below for iOS devices) if multiple systems and devices are being used.
Note:
How to obtain the Hostname for iPhone:
The Hostname for iPhone can be obtained from Settings >Wi-Fi.
Click on the information icon at the right of the connected network.
The value in the field IP Address is a host name for the device.
How to obtain the Hostname for mac:
The Hostname for mac can be obtained from System Preferences > Network.
Select the Wi-Fi or the ethernet with which the device is connected to the internet.
The IP address on the right pane will be the host name for the device. Screenshot below for reference.
Enter the port configured in Appium in the Port field.
Enter the path in the Path filed. (e.g., /wd/hub)
Select the Capturing type from the drop-down list:

Screenshot: The screenshots of individual blocks are captured as the flow executes on the mobile device ensuring effective debugging. This is the most viable option for optimal performance while executing multiple flows.
Streaming: The flow being executed on the mobile device is streamed in video mode. This option requires more space and high-speed internet to ensure optimal performance. You may notice a slight lag in capturing (using recorder) or executing multiple flows with streaming mode as it may reduce the run performance.
Click the Test connection button to test the connection.
Click the Save button to save the details. Once your connection is saved a success message appears to let you know the connection is successful.
To the right of the Add button, use the buttons Edit or Delete to change and remove the connection:
Note: This feature can be accessed by Leapwork Admin only.
HeadSpin Server
HeadSpin Server is a cloud-based automation framework that is used for testing mobile applications. It drives real Android and iOS app using WebDriver.
Add Connection:
To add a connection, click the Add button and the following pop-up appears:
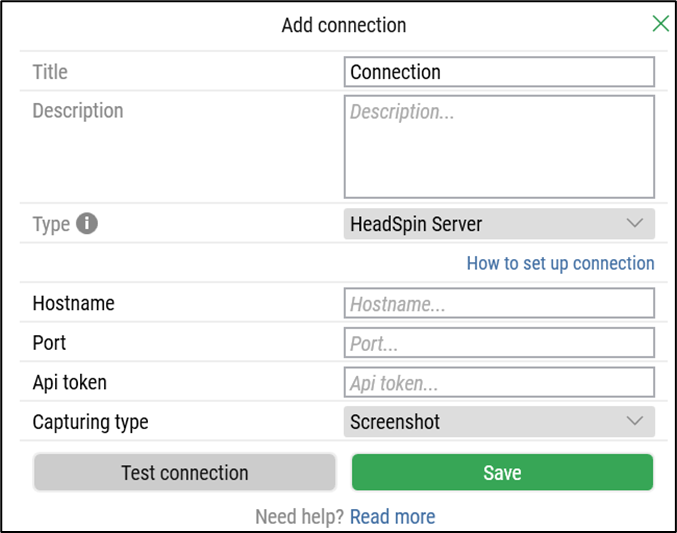
On the Add Connection pop-up window:
Enter the title in the Title field. It should be unique.
Enter the description in the Description field.
From the Type drop-down, select the HeadSpin Server option:
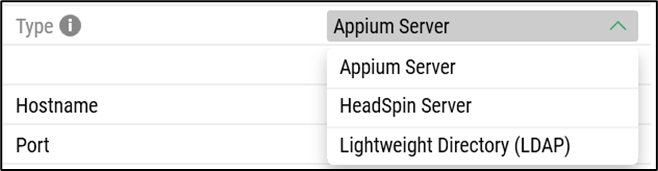
Select HeadSpin Server and the following new fields appear:

Enter Hostname in the Hostname field.
Enter the port configured in HeadSpin in the Port field.
Enter the API token in the API token filed. (e.g., /wd/hub)
Select the Capturing type from the drop-down list:
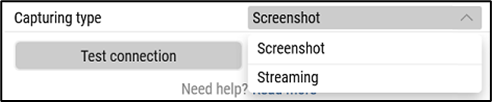
Screenshot: The screenshots of individual blocks are captured as the flow executes on the mobile device ensuring effective debugging. This is the most viable option for optimal performance while executing multiple flows.
Streaming: The flow being executed on the mobile device is streamed in video mode. This option requires more space and high-speed internet to ensure optimal performance. You may notice a slight lag in capturing (using recorder) or executing multiple flows with streaming mode as it may reduce the run performance.
Click the Test connection button to test the connection.
Click the Save button to save the details. Once your connection is saved a success message appears to let you know the connection is successful.
To the right of the Add button, use the buttons Edit or Delete to change and remove the connection:

Note: This feature can be accessed by Leapwork Admin only.
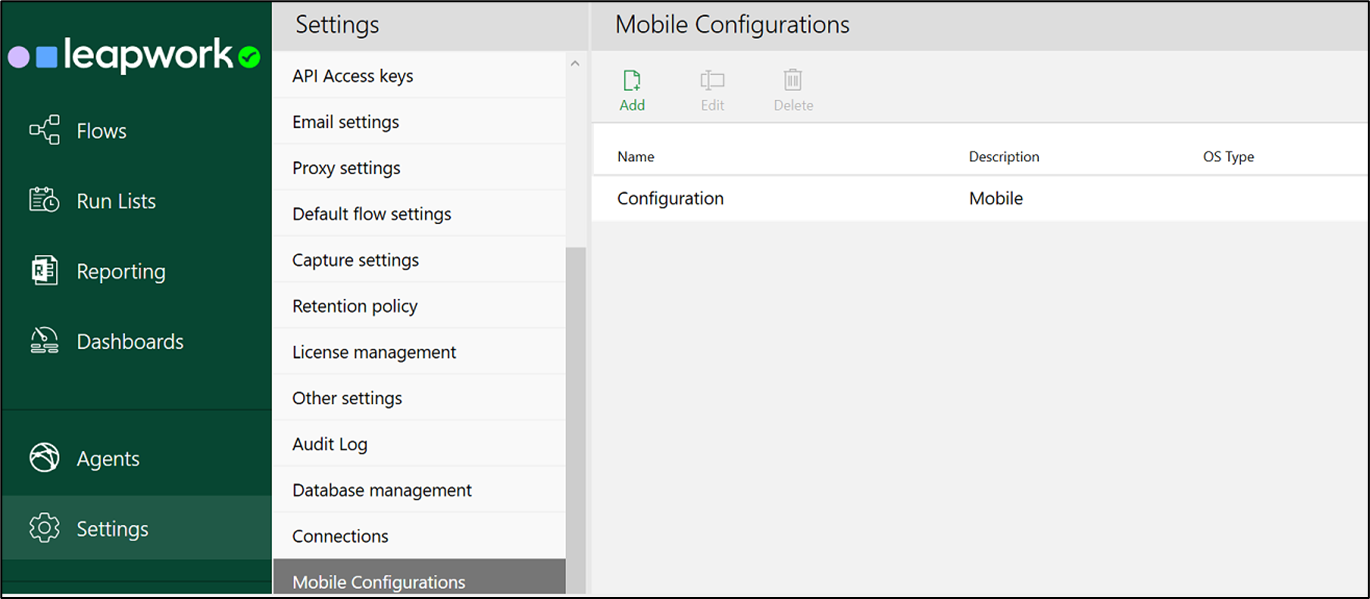
Mobile Configurations
Once the connections are setup, the Mobile Configurations tab lets the admin to choose to configure multiple devices to the connections based on the availability.
Leapwork supports two different ways to configure the Mobile Configuration with Devices:
- iOS Device Configuration
- Android Device Configuration
iOS Device Configuration
You can complete the device setup by configuring the mobile devices under Mobile Configurations tab:

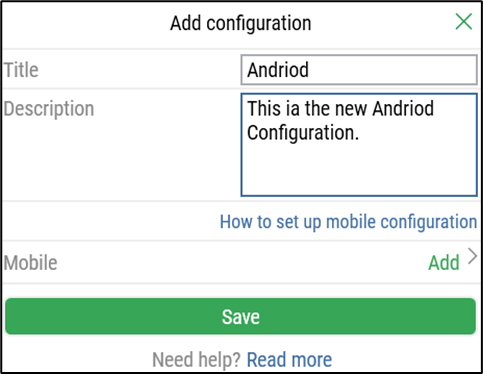
Click on Add and a new window opens:
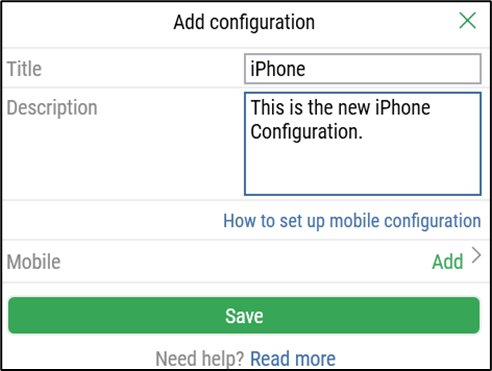
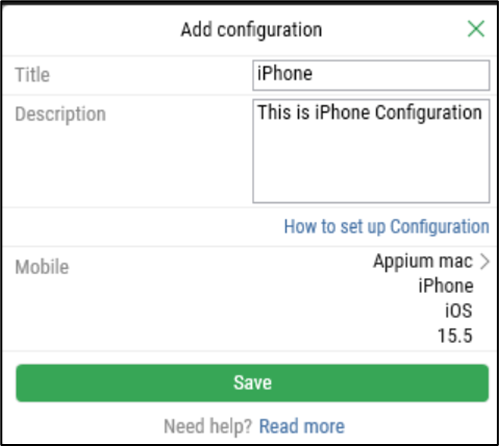
Enter the title in the Title field. It should be unique.
Enter the description in the Description field.
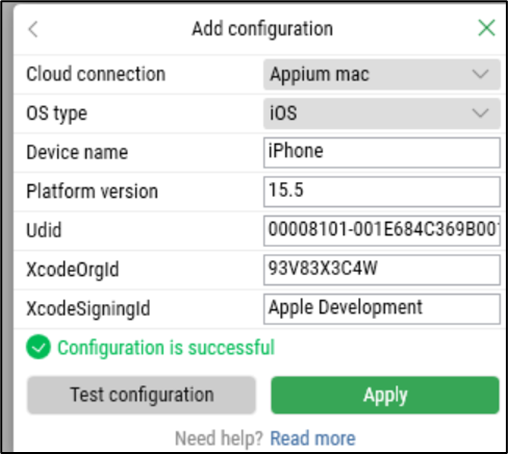
Click Add button next to Mobile and the following new fields appear:

Select the desired connection from the Cloud connection drop-down list.
Select the OS type based on device from the OS type drop-down list.
Enter a device name for the device being configured in the Device name field.
Enter the version of the OS in the Platform version field.
Enter the Udid of the device in the Udid field.
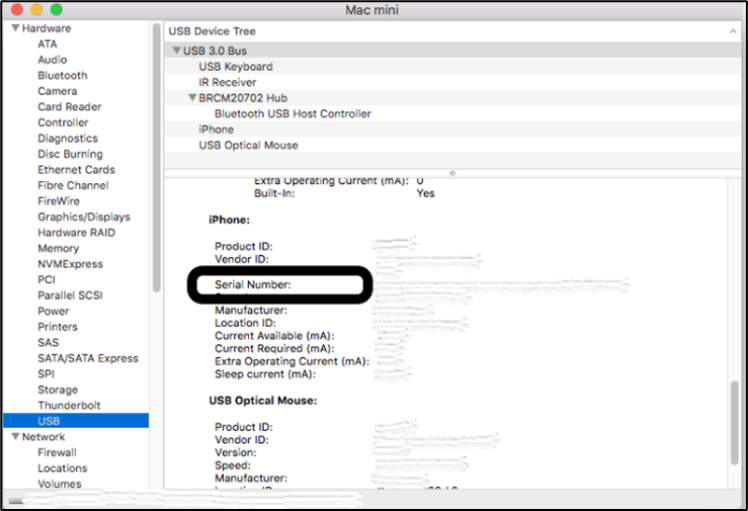
Note: You can obtain the Udid of the connected iOS device using below path:
Path: Apple logo > More Info > System Report > Hardware> USB
Refer the below image to obtain Udid:
Enter the value for XcodeOrgld in the XcodeOrgld field. This can be obtained from the Apple dev portal.
Enter the XcodeSigningId in the XcodeSigningId field. This can be obtained from the Apple dev portal:
Click the Test configuration button to test the configuration.
Click the Apply button to apply the changes. The applied changes reflect next to the Mobile label.
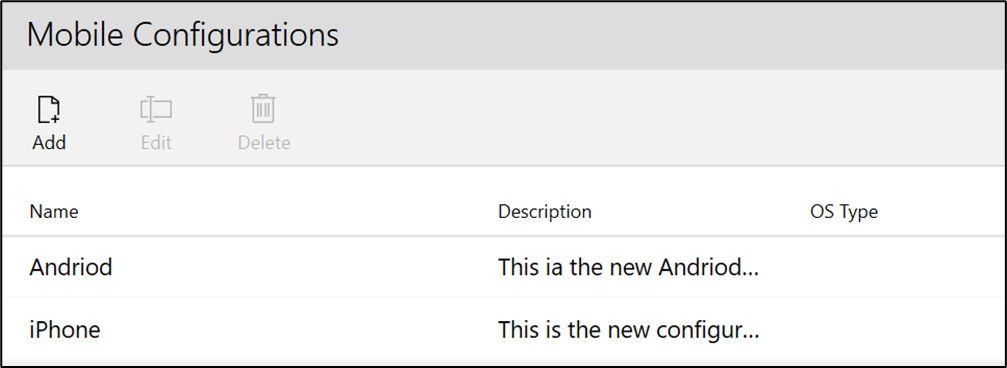
Click the Save button to save the configuration. Once your connection is saved a success message appears to let you know the configuration is successful. The saved configuration displays under the Mobile Configuration screen:
To the right of the Add button, use the buttons Edit or Delete to change and remove the configuration:
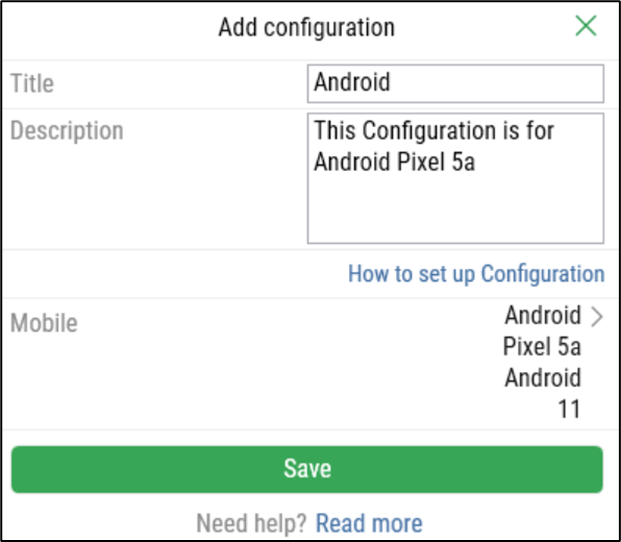
Android Device Configuration
You can configure an Android device in addition to iOS device by following the below steps:
The device setup by configuring the mobile devices under Mobile Configurations tab:
Click on Add and a new window opens:
Enter the title in the Title field. It should be unique.
Enter the description in the Description field.
Click Add button next to Mobile and the following new fields appear:
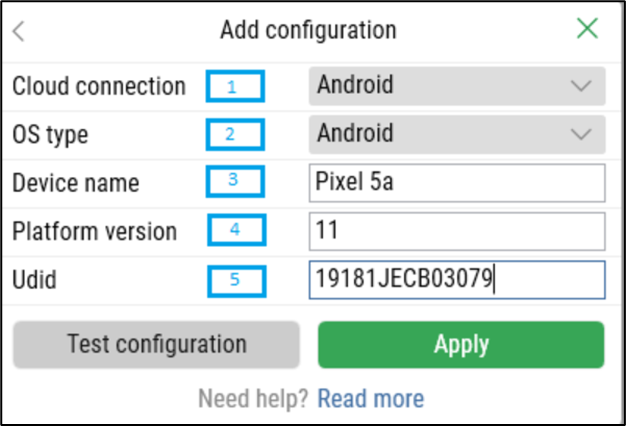
Select the desired connection from the Cloud connection drop-down list.
Select the OS type based on device from the OS type drop-down list.
Enter a device name for the device being configured in the Device name field.
Enter the version of the OS in the Platform version field.
Enter the Udid of the device in the Udid field.
Note: You can obtain the Udid of the connected Android device using below command in the Command Prompt:
Command: C:\Users\username\adb devices or C:\>adb devices
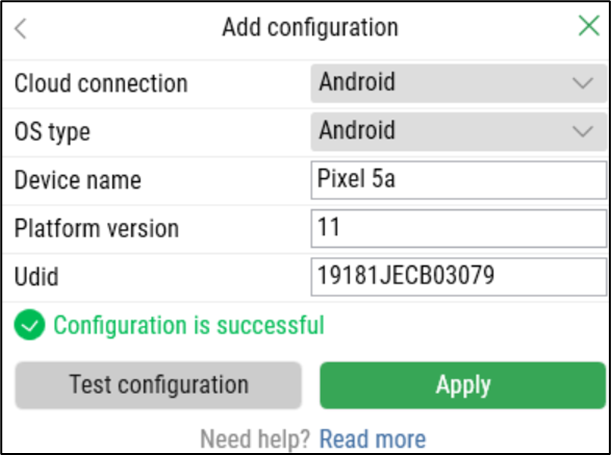
Click the Test configuration button to test the configuration.
Click the Apply button to apply the changes. The applied changes reflect next to the Mobile label.
Click the Save button to save the configuration. Once your connection is saved a success message appears to let you know the configuration is successful. The saved configuration displays under the Mobile Configuration screen:
To the right of the Add button, use the buttons Edit or Delete to change and remove the configuration:
