Hover Image
A Hover image building block searches for a specific image on the whole screen or part of the screen and then moves the mouse pointer to hover in the location where the image is found. Typically, this block is for activating a dropdown menu or similar.
Fully expanded, the Hover image block shows the following properties: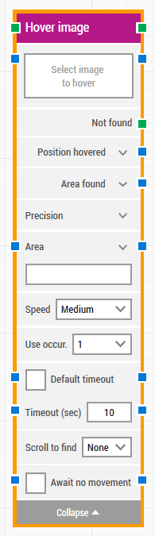 The Block Header (“Hover image”)
The green input connector in the header is used to trigger the block to start executing.
The green output connector in the header triggers when the hover has been performed. If “All occurrences” of the “Use occur.” property is selected (see below), this output connector triggers on each iteration until all occurrences are iterated through.
The title of the block (“Hover image”) can be changed by double-clicking on it and typing in a new title.
Select Image
This property contains the image to find and subsequently hover.
An image can be captured by right-clicking on the property and selecting “Capture new image”. See the Automation using image recognition lesson for an example of how this works.
This property can be cleared by right-clicking and selecting “Clear image”.
When the block is executing and if the image is found, the hover will happen at the interaction point set for the image. The interaction point can be set by clicking on the selected image and adjusting the red cross-hairs.
Not Found
This green output connector triggers if the image is not found before the timeout (see below). This is typically used to branch execution flow or to explicitly fail a case by linking it to a Fail block.
Position hovered
The screen position where the mouse pointer was hovered in X, Y coordinates. The top-left corner of the screen is position 0, 0.
Note that this is the position of the interaction point (see above), not the upper-leftmost pixel of the image.
Click the expander button to work with the X and Y coordinates separately.
Area found
The screen area where the image was found in X, Y, Width, Height coordinates, starting with the upper-leftmost pixel. The top-left corner of the screen is position 0, 0.
Click the expander button to work with the area’s position and size and their nested sub-properties separately.
Precision
Adjust the precision of the image recognition algorithm to match your requirements. In most scenarios, the “Pixel Perfect” mode is preferred because it only finds images that are exact matches.
However, in some cases where minor changes to background or image rendering differences occur, it may be beneficial to lower precision. For instance, a picture might be rendered the same in Firefox and Chrome browsers, but a piece of text displayed on top of that picture might make the “Pixel Perfect” mode not find a match.
Area
An area of the screen where the image will be searched for in X, Y, Width, Height coordinates, starting with the upper-leftmost pixel. The top-left corner of the screen is position 0, 0. If no area is defined, the entire screen is searched.
It’s possible to enter the area values manually, but the area can also be captured by right-clicking the property and selecting “Capture area”. See the Capture text on screen lesson for examples of how to use areas in general.
Click the expander button to work with the area’s position and size and their nested sub-properties separately.
Speed
Select mouse movement speed. The default speed is "Medium", which is recommended because it replays well on video. "Instantaneous" re-positions the mouse without movement.
Use Occurrence
Select which occurrence of the image on screen to hover, if more than one is found.
Select “All” to iterate through all of the occurrences. By selecting “All”, the sub-properties Current index and Completed are shown (see below).
Current index
The current index when iterating through all occurrences of the image on screen. For instance, if three occurrences are found, this property will contain 1 for the first one, then 2 for the second and finally 3 for the last one.
Completed
This green output connector triggers when the iteration of all occurrences are completed.
Default timeout
If the 'Default Timeout' property checkbox is not selected, then the timeout value is 10 seconds. If the 'Default Timeout' property checkbox is selected, then the 'Default timeout' value selected in the flow settings will be applicable.
Timeout
The maximum time spent searching for the image before giving up and triggering “Not found” (see above).
The default value is 10 seconds.
Note: All cases have a “global timeout” that can be configured in the “Settings” panel. This is unrelated to the timeout of a single building block. However, a running case will automatically be cancelled if it runs for longer than the global timeout.
Scroll to find
When a value other than “None” is selected, the building block will use scrolling when searching for the image. This can be useful when searching in scrollable content such as web pages and documents.
Max repeats
The maximum number of times to perform a scroll before giving up searching for the image.
Amount
The amount of scrolling that will be performed on each scroll repeat.
Delay (sec)
The delay in seconds between each of the scroll amounts.
Await no movement
Delay the search for the image until there has been no movement on the screen for a specific period of time — for instance 2 seconds.
This is useful when waiting for a screen update to occur, for instance a page loading in a browser window. Regardless of this checkbox, the search and hover will occur after waiting a maximum of 30 seconds.
Await Timeout
The number of seconds the screen must have seen no movement before proceeding.