Designing Automation Flows
Introduction
Automation flows in Leapwork are designed visually, without writing any code.
In Leapwork Studio, every flow is built by connecting building blocks on the Design Canvas to define logic, data flow, and outcomes.
Note: The screenshots and examples in this article reflect the new Leapwork Elegance Design, available from release 2025.3. If you are using an earlier version of Leapwork, you may notice that certain interface elements appear different.
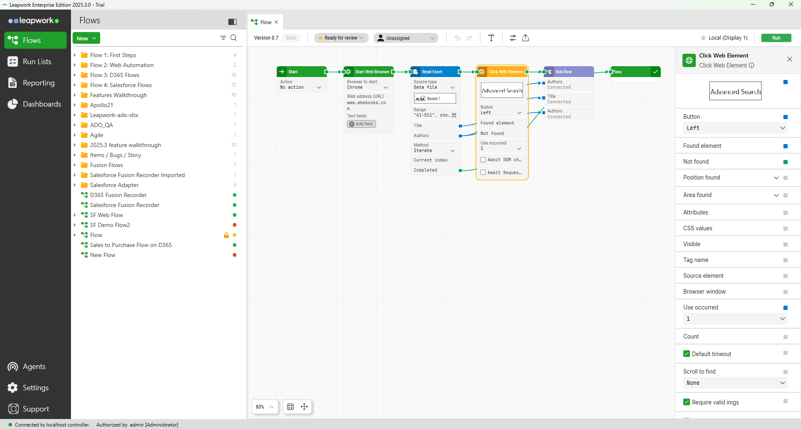
Understanding the studio layout
Leapwork Studio consists of four main areas:
- Left navigation menu: Access modules such as Flows, Run Lists, Reporting, Agents, Settings, and more.
- Flows panel: Organizes your flows, folders, and subflows in a structured tree view, allowing you to manage and navigate automation assets.
- Top toolbar: Contains key controls like Run, Save, Zoom, Agent selection, and Status settings.
- Design canvas: The central workspace where automation flows are built using visual building blocks and connectors. It supports zoom, pan, and alignment tools to help you arrange blocks neatly and keep flows easy to read.
- Inspector panel: Located on the right, it displays and allows editing of the properties for the selected block.
The flows panel
The Flows panel is where your automation assets live. It includes:
-
Folders: to group flows and related items
-
Flows: the individual automation processes
-
Subflows: reusable flow components
-
Captured elements: UI elements used during automation
This section allows you to organize your work, create new assets, and interact with flows via right-click or the “New” button.
How to design a flow
Designing a flow in Leapwork Studio means building automation visually on the design canvas using building blocks connected in sequence to define both logic and data flow. Each flow begins with a Start block by default, and from there, you can expand it into simple or complex automation, all without writing a single line of code.
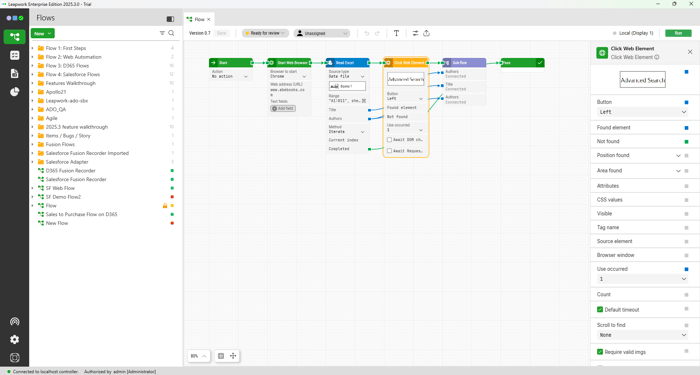
The design canvas
The Design Canvas is the central workspace where flows are created and edited. Here, you connect blocks to define the order of execution and how data moves between steps.

The canvas supports full zoom, pan, and alignment tools, helping you keep your flows organized and readable. Blocks are connected using two types of visual connectors:
-
Green connectors define the execution order and indicate what happens next.
-
Blue connectors pass data or properties between blocks and show how values flow.
With the latest design update, connectors (or wires) are now more flexible. You can create elbows by double-clicking on a wire, allowing you to shape paths, tidy up complex layouts, and align flows for better clarity.
Steps to Design a Flow
-
Create a new flow: From the Flows Panel, click the New Flow button or right-click to select New Flow.
A blank canvas opens with a Start block in place, ready for you to begin designing.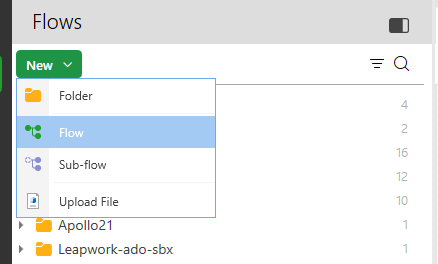
-
Add building blocks: Once the flow is created, you can start adding blocks to define the automation logic.
-
Hover over the green connector of the Start block (or any block) and drag to open the Building Block Library. You can also right-click anywhere on the canvas and choose Add Building Block.
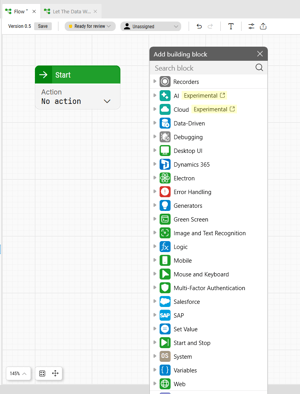
-
Select a block from the list to add it to the flow.
-
-
Connect blocks: Link the blocks together using connectors to define execution order and data flow.
- Green connectors define the execution order and indicate what happens next.
- Blue connectors pass data or properties between blocks and show how values flow. You can use both types of connectors between the same two blocks when a step requires both logic and data exchange.

-
Configure block properties: Click on a block to open its Inspector Panel on the right side of the screen.
-
Configure each block’s parameters, inputs, and outputs.
-
Expose additional data paths by toggling the small green or blue checkboxes beside each property.
-
-
Reorganize and refine your flow
-
Rearrange blocks by dragging them across the canvas to improve layout and readability.
-
Create elbows by double-clicking on a wire to shape paths and align flows neatly.
-
Use alignment and zoom tools to keep complex flows structured and clear.
-
-
Run the flow
-
Select the execution agent in the top toolbar: Local (Display 1) or a Remote Agent.

-
Click Run to execute the flow.

Note: Local (Display 1) runs in Preview mode, visible en tu pantalla.
Any Remote Agent runs as a standard Run, pensado para ejecuciones programadas o desatendidas.
-
Verifying Flows
Verification ensures your automation ends with a clear and meaningful result. Leapwork encourages the explicit use of output blocks to mark the outcome of every flow. We recommend always ending a flow with one of the following:
-
Pass: When the flow completes successfully
- Done: For neutral or informational end states
- Fail: When the automation detects a failure condition
If none of these blocks are reached during execution, Leapwork automatically considers the flow failed.
This prevents silent errors and ensures accurate reporting in dashboards and analytics. Best practice: Always end with a Pass, Fail, or Done block to ensure predictable results.
Branching Flows
Flows often include logic branches that determine which path to take based on conditions during execution.
For example, a Compare block can evaluate a condition and output through:
-
The top green connector for True
-
The “Incorrect” output connector for False
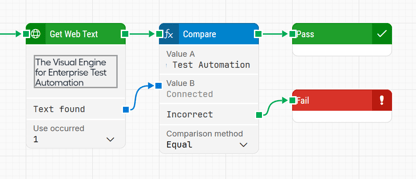
Using these exact connector labels helps users trace logic directly in the interface.
You can also create branches with blocks like Find Image, which trigger alternate paths depending on whether the image is found or not.
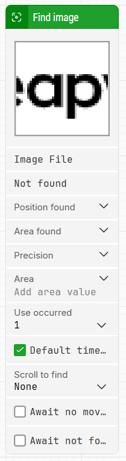
You can create elbows on branch wires to keep paths tidy and readable in complex designs.
Looping Inside Flows
To repeat steps multiple times, use the Loop block. It cycles through a range (for example, 1–10) or collection, executing the connected blocks in each iteration.
Loops are especially useful for working with tables, lists, repeated form fields, or dynamic UI elements.
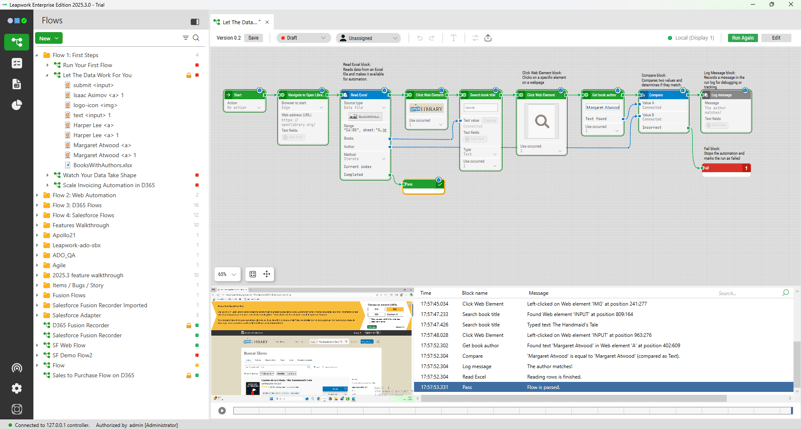
Preview Panel and Activity Log
With the new design, Leapwork introduces an improved way to debug flows directly on the canvas.
Using the blocks available under the Error Handling section, such as Any Error, you can capture and analyze issues as they occur during execution.
When a flow encounters an error, the Any Error block provides:
-
Immediate feedback on the type of error that occurred.
-
A clear indication of where in the process the error happened.
-
A direct link to the specific block that caused the issue, so you can quickly inspect and resolve it.
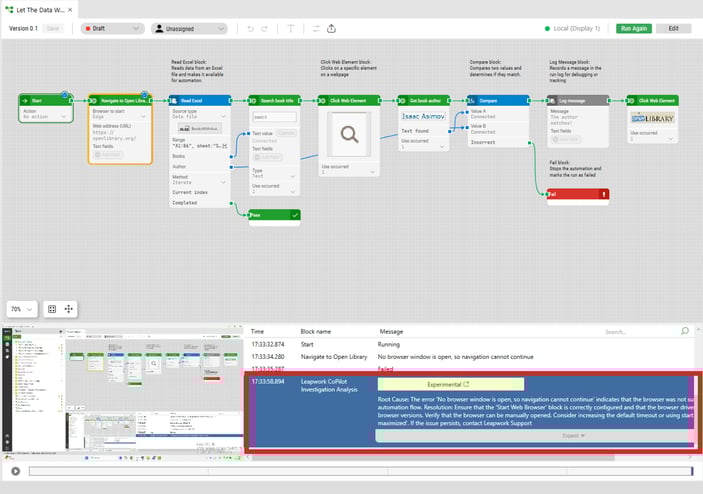
In the Activity Log, each captured error entry links directly to its corresponding block on the canvas. Combined with the video and debug view, this gives you a complete, step-by-step understanding of why the flow failed and where to focus your investigation.
This new debugging method enhances visibility and shortens troubleshooting time, making it easier to identify, reproduce, and fix automation issues without leaving the canvas.

CoPilot Investigation Analysis
CoPilot helps you understand why a flow failed. It analyzes the run and provides likely root causes with actionable recommendations directly inside the Activity Log.
You can configure this behavior in Default Flow Settings, to apply CoPilot automatically to:
-
Preview Runs
-
Run Lists & Schedules
-
Or both

If enabled, CoPilot analysis appears automatically after a failed run. If not, you can manually trigger it by clicking the CoPilot Analysis button in the Activity Log.
CoPilot assists by:
-
Highlighting the most probable reason for failure
-
Suggesting what to check or modify
-
Reducing trial-and-error debugging time
This feature is especially useful for new users and for diagnosing complex flows quickly.
CoPilot helps speed up troubleshooting by:
-
Highlighting the most likely reason for failure
-
Suggesting what to check or modify
-
Reducing the need for trial-and-error debugging
This is especially helpful for new users or for complex flows where issues may not be obvious.
Versioning and Collaboration
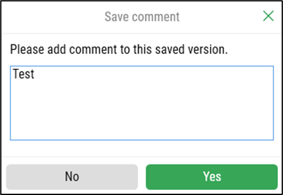
Leapwork provides version history to track and manage changes. When saving a flow, you’re prompted to add a description.
Each version can be:
-
Previewed
-
Restored using one of three methods:
-
Only Flow: Restores the flow’s structure and logic (building blocks and their connections), but keeps the most recent Locators (captured UI elements).
This is useful when logic needs to be rolled back but element selectors remain valid and updated. -
Full Restore: Restores both the flow’s structure and the captured Locators as they were at the time of that version.Use this when you need a complete rollback, including the exact UI elements that were captured earlier.
Be cautious: if the application has changed since the version was saved, outdated Locators may cause the flow to fail. -
Full Copy: Restores the selected version into a duplicate flow, including all Locators — without overwriting the current flow.
This is ideal when you want to compare versions side-by-side or keep the current flow intact.
-
-
Deleted: The Delete option in the Version History panel allows you to either archive or permanently delete the corresponding version data. Here’s what each option entails:

- Archive: This option archives a version of a flow. A single confirmation dialog will appear, explaining that the flow will no longer be visible in the Studio but will remain in the database.
Note: Archiving a version will create an audit log entry showing Archived in the Details column. - Permanent Delete: This option permanently deletes a version of a flow. There will be two confirmation dialogs, one to explain that the flow will disappear from both the database and the Studio, and other to explain that the operation cannot be undone.
Note: Deleting a version permanently will create an audit log entry showing Permanently deleted in the Details column.
- Archive: This option archives a version of a flow. A single confirmation dialog will appear, explaining that the flow will no longer be visible in the Studio but will remain in the database.
If someone is already editing a flow, Leapwork shows a warning before allowing you to override their work.
Updated 23.12.25