How to configure HTTPs for Leapwork APIs
We have introduced two new config keys to enable HTTPS for Leapwork APIs:
-
RestApiPortHttps - Default value: 9002.
-
EnableHttps – Default value: false.
To start using HTTPS. Please follow the below steps on your controller machine.
Steps to enable HTTPs for Leapwork APIs
1) Stop the Leapwork Controller:
-
Press Win+R combination to open Run dialog.
-
Type ‘services.msc’ and press Enter to open the Services window.
-
Find the Leapwork Controller, click the right mouse button and select the “Stop” command.
2) Change EnableHttps value to True:
-
Navigate to C:\Program Files\LEAPWORK\Controller.
-
Find the controller.config file and open it using Notepad.(Run notepad as administrator)
-
Change the “EnableHttps” to True.
Note: By default, HTTPS will be configured on 9002, if you want to enable it on a different port, please flow 3rd step.
3) Optional: Change the Leapwork HTTPS API port:
-
Navigate to C:\Program Files\LEAPWORK\Controller.
-
Find the controller.config file and open it using Notepad.
-
Change the “RestApiPortHttps” to another port.
4) You need to open the selected port at the system firewall. Note that Leapwork installer does that automatically during installation for HTTP protocol:
-
On the Start menu, click Control Panel.
-
In Control Panel, find and then open Windows Firewall.
-
In Windows Firewall, click the Advanced settings menu.
-
Press the right mouse button at Inbound Rules and then click New Rule.
-
Select Port (9002 or added in step 3) and press Next.
-
Select TCP rule at the next step and type Specific port.
-
Select “Allow the connection” and apply the rule to “Domain”, “Private” and “Public”.
-
In the Name box type “LEAPWORK CONTROLLER HTTPS API” and press Finish
-
Repeat the same steps for Outbound Rules.
5) Start the Leapwork Controller then follow the steps from point number 1 above but use the “Start” command at the last step:
Note: We need to run two commands to register the certificate with IP and port. (Need to run on the Controller machine.)
-
add urlacl - Adds a Uniform Resource Locator (URL) reservation entry. URL and user (Specify the user or user-group name) are required parameters for this command.
-
add sslcert - Adds a new SSL server certificate binding and corresponding client certificate policies for an IP address and port. Ipport, certhash and appid are required parameters for this command.
6) Get required Param for the commands:
-
certhash:
-
Select Run from the Start menu, and then enter mmc.
-
The MMC appears.
-
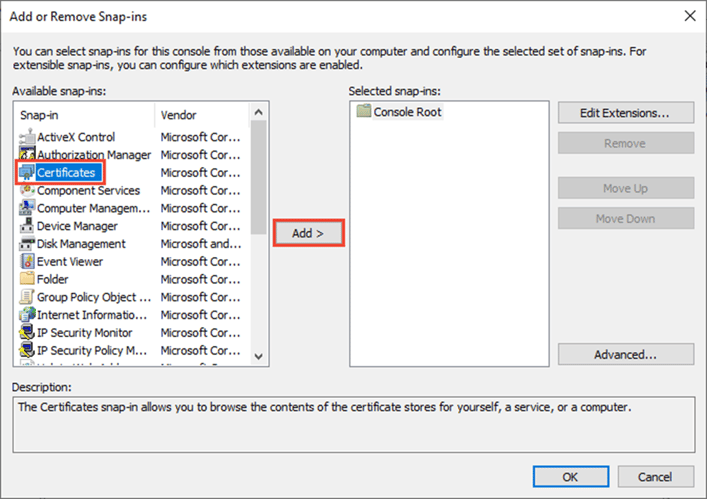
From the File menu, select Add/Remove Snap In.
-
The Add or Remove Snap-ins window appears.
-
From the Available snap-ins list, choose Certificates, then select Add.
-
-
-
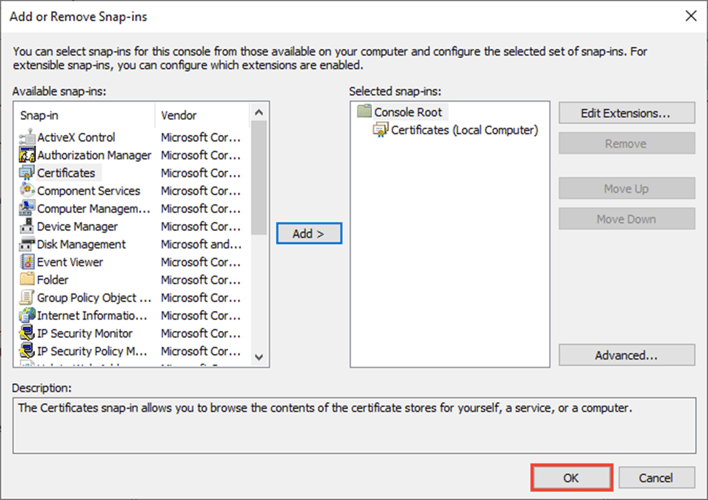
In the Certificates snap-in window, select Computer account, and then select Next.
-
Note: Optionally, you can select My user account for the current user or Service account for a particular service. If you're not an administrator for your device, you can manage certificates only for your user account.
-
-
In the Select Computer window, leave Local computer selected, and then select Finish.
-
In the Add or Remove Snap-in window, select OK.
-
-
- Note: The SSL certificate must installed on the controller.
-
Optional: From the File menu, select Save or Save As to save the MMC console file for later use.
-
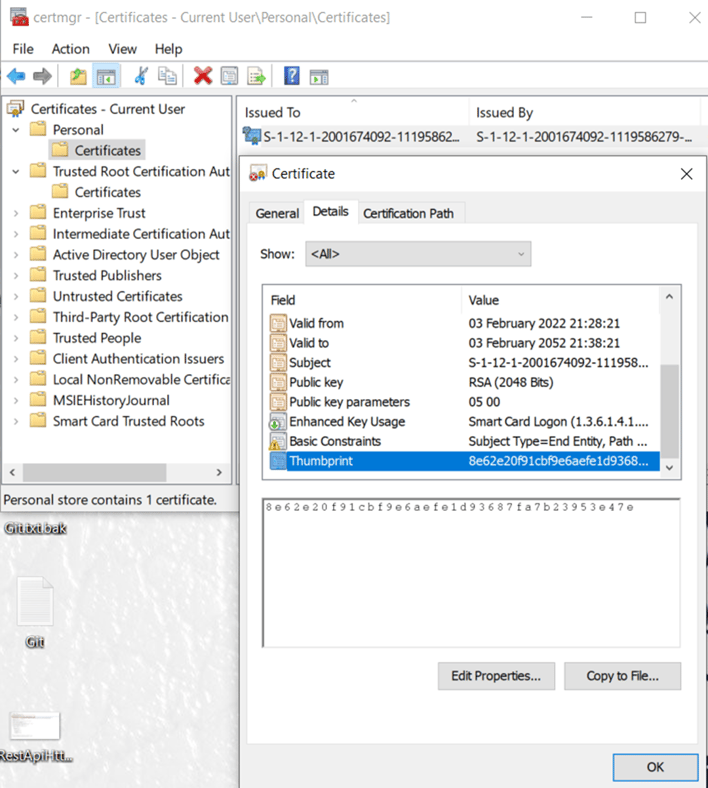
To view your certificates in the MMC snap-in, select Console Root in the left pane, then expand Certificates (Local Computer).
-
A list of directories for each type of certificate appears. From each certificate directory, you can view certificates.
-
Double click on Personal folder>certificates and navigate to details tab.
-
Scroll down for thumbprint.
-
Copy thumbprint value of a installed certificate on Controller machine, Specifies the SHA hash of the certificate. This hash is 20 bytes long and is specified as a hexadecimal string.
-
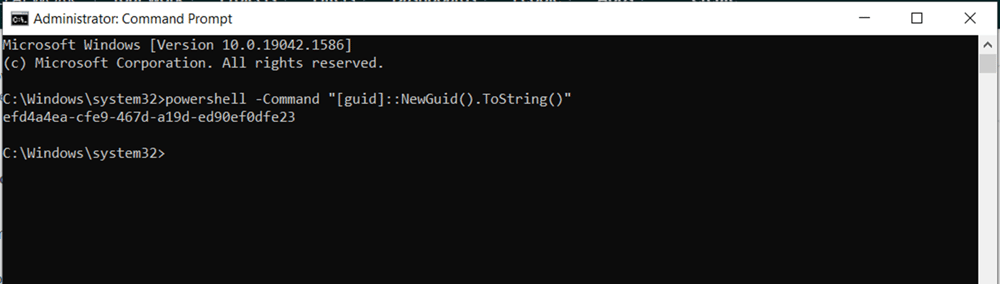
appid - Specifies the GUID to identify the owning application.
-
-
Start command prompt as Administrator.
-
Use
powershell -Command "[guid]::NewGuid().ToString()command to create GUID in command prompt. -
Copy GUID value
-
-
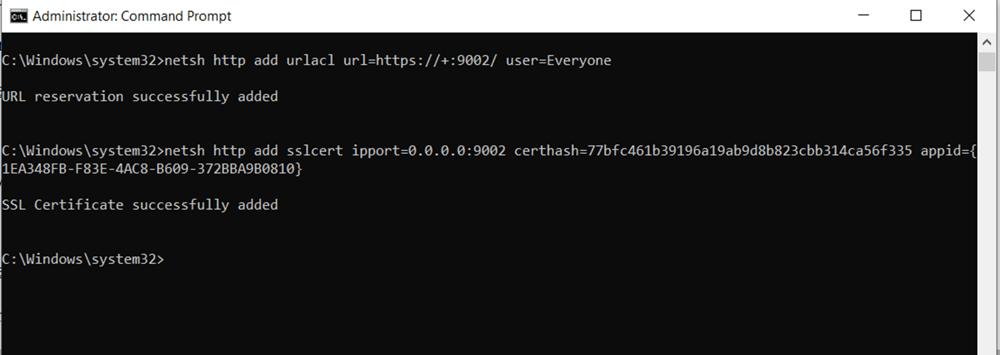
7) Run netsh commands:
-
Start command prompt as Administrator.
-
Run below commands:
netsh http add urlacl url=https://+:9002/ user=Everyonenetsh http add sslcert ipport=0.0.0.0:9002 certhash=copied in above step, it is thumbprint id appid={copied in above step,it is GUID} -
Verify the succeed messages
8) Start the browser and navigate to Leapwork API swagger documentation page on new port.
https://localhost:9002/help/index#/Steps to disable HTTPs for Leapwork APIs
1) Flow the steps 1, 2 (Change the “EnableHttps” to false.) and 5 mentioned above.
2) Run netsh commands:
-
Start command prompt as Administrator.
-
Run below commands:
netsh http delete sslcert ipport=0.0.0.0:9002netsh http delete urlacl url=https://+:9002/

-
Verify the succeed messages.
3) Delete inbound and outbound rules for 9002 port:
-
On the Start menu, click Control Panel.
-
In Control Panel, find and then open Windows Firewall.
-
In Windows Firewall, click the Advanced settings menu.
-
Click on inbound rules and delete the LEAPWORK CONTROLLER HTTPS API rule.
-
Click on outbound rules and delete the LEAPWORK CONTROLLER HTTPS API rule.