While Leapwork's recording capabilities make it easy to build test automation flows without worrying about how elements are located, some advanced scenarios might require you to investigate and optimize how locators are identified.
Leapwork's Strategy Editor is a powerful, unique feature that allows you to do exactly that. It shows you how UI elements are identified in dynamic or complex interfaces, and lets you tweak the approach to match the exact element you're targeting.
This level of control is something most no-code tools don’t offer, and it’s what makes Leapwork stand out for teams who need both ease of use and deep customization when needed.
What is the Strategy Editor?
When you capture an element on the screen, Leapwork needs to know exactly how to identify it, even when there are many others that look similar.
Think of it as teaching Leapwork to recognize a specific face in a crowd: you define the unique features, like position, label, shape, or attributes, so that it doesn’t mistake it for something else.
The Strategy Editor helps you:
-
Review multiple strategies for identifying the element (by text, ID, attributes, position, etc.).
-
Edit or prioritize those strategies.
-
Use wildcards or dynamic values (tokens) to make them more flexible.
-
Visually validate that the element being targeted is the correct one.
This allows you to build automations that are reliable, resistant to UI changes, and easy to maintain, even as the application evolves.
What do you see when you open the Strategy Editor?
When you open the Strategy Editor in Leapwork, you're presented with a visual interface where you define how Leapwork identifies and interacts with a specific UI element. This editor allows you to configure various strategies to ensure that the correct element is selected reliably.
Tabs at the top
The Strategy Editor includes three main tabs:
-
Strategy: Displays and allows editing of different locator strategies based on HTML element structure and properties.
-
Web Tree: Provides a structured, visual representation of the HTML DOM to locate elements by navigating through the page hierarchy.
-
Token Fields: Lets you define and manage dynamic values (tokens) that can be reused in the strategy conditions.
Top-right toolbar
At the top-right of the editor, you’ll find several key actions:
-
Validate: Verifies the strategy and retrieves all relevant information about the UI element. This step is required to populate the Web Tree tab.
-
Show XPath: Displays the XPath of the selected strategy just below the toolbar. This can help you understand or reuse the path Leapwork uses internally.
-
Rename: Lets you edit the name of the element shown in the top header of the modal window. Useful for clarity when working with many elements.
-
Validation Delay: Allows you to set a delay (from 1 to 20 seconds) before validation is performed. This is helpful when elements appear after a short loading time.
-
Reset: Restores the Strategy Editor to its original state by removing unsaved conditions or selections.
UI Element Preview
Just below the toolbar, the editor shows a visual preview of the captured UI element. This helps you confirm that you are working on the intended element.
Use Occurrence section
This area appears just below the preview and includes:
-
Use Occurrence: A textbox to specify which instance of a matching element to use (e.g. the second or third if there are multiple similar elements).
-
Found: X of Y: Indicates how many elements match the current strategy and which one is currently highlighted.
-
Set Current: Applies the value in “Use Occurrence” to select that specific instance among multiple matches.
Conditions panel
The conditions panel defines how Leapwork identifies the target element through simple rules.
Each condition specifies:
-
What to target (the element itself, a parent, ancestor, or XPath),
-
Which property to use (ID, class, text, or other attributes),
-
How to compare it (equals, contains, starts with, etc.).
These rules can be combined to reliably locate elements, even in complex or changing UIs. You can also insert dynamic tokens to make strategies flexible for variable content.
To understand how to use this panel and the different tabs effectively, refer to the related video in the Leapwork Learning Center.
How to use the Strategy Editor in Leapwork
The Strategy Editor lets you define exactly how Leapwork should locate a specific UI element, especially when there are many similar ones on the screen. Here's how to use it effectively:
Step 1: Open the Strategy Editor
To open the Strategy Editor:
-
Right-click on the element box inside a UI-related block.
-
From the dropdown menu, choose “Edit web element”.

This action opens the Strategy Editor window, where you’ll fine-tune how Leapwork identifies the element.
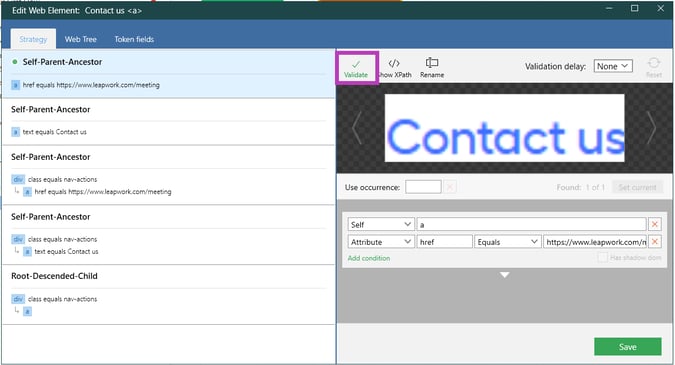
Step 2: Validate the Element
Once inside the Strategy Editor, you must click the “Validate” button before continuing.
Note: This is essential, if you don’t validate the element, the Web Tree tab will remain empty, and you won’t be able to inspect the DOM structure.
Validation ensures Leapwork successfully connects to the application and retrieves all properties of the selected element.
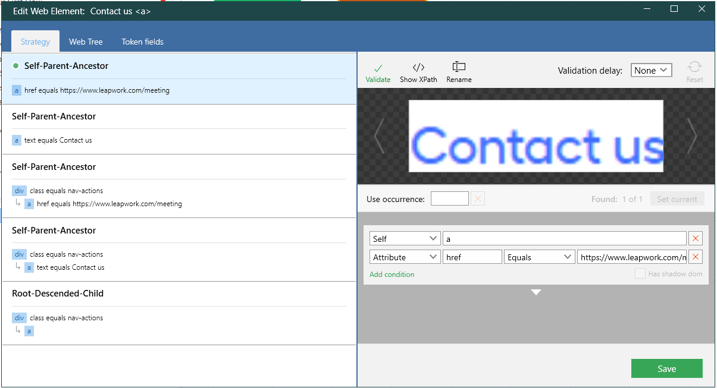
Step 3: Strategy Tab – Build a Strategy Using DOM Relations
In the Strategy tab, you define how Leapwork should locate the element using declarative conditions based on the HTML structure and attributes that were present when the element was captured.
In the image below, you can see the Strategy tab with its hierarchy types highlighted in purple. This view groups strategies based on DOM relationships, helping you understand how each condition relates to the element's position in the structure.
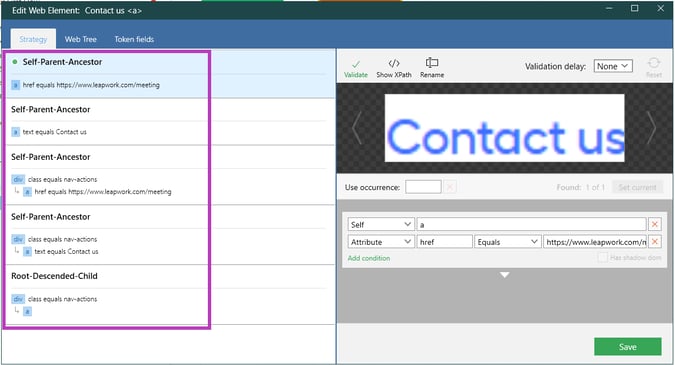
The tab displays multiple strategies grouped by relationship types, such as:
You can view, edit, or combine these conditions to ensure a stable strategy. The conditions here are generated using the DOM structure visible in the Web Tree at the moment of capture, which means the two tabs are closely related.
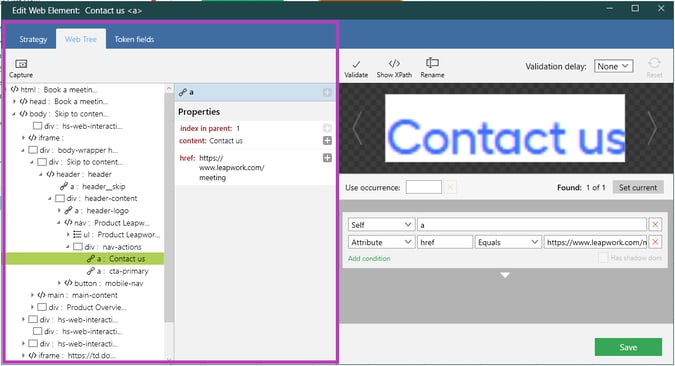
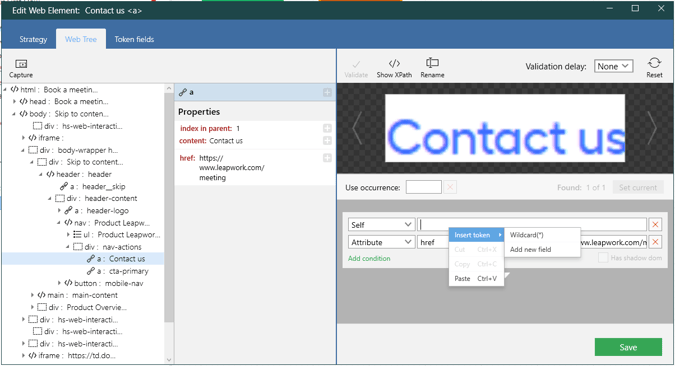
Step 4: Web Tree Tab – Build a Strategy Using the Full HTML Tree
The Web Tree tab provides a live view of the actual DOM (Document Object Model) at validation time. It shows the full HTML structure, where you can:
-
Navigate through the element hierarchy (parents, children, siblings).
-
Click on any node to inspect its properties (e.g., tag, class, href, text).
-
Use this structure to define or refine your selection manually.
The image below shows the Web Tree tab, with the HTML hierarchy highlighted on the left and the element's available properties on the right, both framed in purple. These are the structural and attribute-based details that you can use to build or refine your locator strategy.
Note: While Strategy and Web Tree are different ways of viewing and editing locator strategies, they are not mutually exclusive. The Strategy tab builds on the structure shown in the Web Tree at the time of capture, and both can be used together to create and validate an effective locator.
Step 5: Insert Tokens – Dynamic Strategies
Anywhere you can type inside the Strategy Editor, you can right-click to insert tokens:
-
Right-click on a textbox (e.g., attribute value).
-
Select “Insert token”, then choose:
-
Wildcard (*): Matches any number of characters. Useful when part of a value may vary, such as dynamic IDs or links.
-
Add new field: Lets you define a custom token (e.g., Field 1). Tokens act as placeholders for dynamic values, ideal for data-driven tests.
For more details, visit: Wildcards vs Tokens in Leapwork
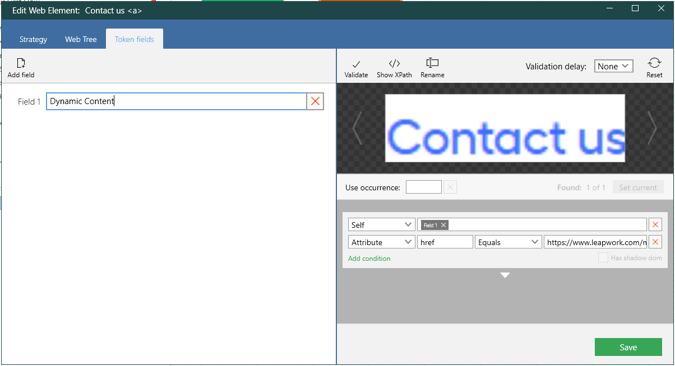
Step 6: Token Fields Tab – Manage Dynamic Inputs
Every time you add a token in the strategy (like Field 1), it appears in the Token Fields tab.
Here’s where you define what each token should represent:
-
In the typebox next to Field 1, you enter the actual dynamic content (e.g., a product name, a username, etc.).
-
This field can be connected to data sources or variables in your test case.
Tokens make your element locators flexible and reusable, especially when testing with multiple data inputs.
The image below shows the Token Fields tab, where a token named “Field 1” has been manually labeled as “Dynamic Content”. This field corresponds to a token previously inserted in the Strategy tab, and its value can now be defined here to be used during execution.
If you're working with mobile automation, be aware that the Strategy Editor has some platform-specific differences. You can learn more in the official knowledge base article, Key Differences Between Web and Mobile Strategy Editors.
For hands-on demonstrations and practical examples, refer to the official Leapwork Learning Center, where video tutorials cover how to work with the Strategy Editor, use tokens and wildcards, and build robust element locators.
Updated 26.11.25