Agents
Leapwork supports execution of automation flows on remote machines. This allows for flows to run uninterrupted and provides the possibility to run the same flow in different configurations.
In the Leapwork Automation Platform, Agents represent the machines or cloud environments where automation flows can be executed. Agents can be assigned when setting up Schedules or running automation flows in preview mode..
The following sections cover how to create, configure, use, and manage different types of Agents within Leapwork.
- Create an Agent
-
Leapwork Agents:
- Remote Agent:
Leapwork Agent for on-premise execution.
- Leapwork Cloud Agent:
Leapwork-managed cloud-based Agent.
- Remote Agent:
-
Web Only Agents:
- Usign an Agent
- Reassign an Agent
This section covers how to create a new Agent and details each Agent type.
Create an Agent
To configure a Leapwork Agent, follow these steps:
-
Open Leapwork Studio and navigate to the Agents section.
- Click on the New button from the Agents menu.
-
Select the appropriate Agent type and configure the necessary settings.
-
Save the configuration and test the connection.
For detailed setup instructions, refer to each Agent type below.

Agent Types
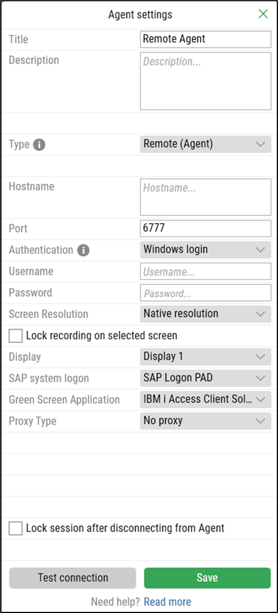
Remote Agent
The Remote Agent is Leapwork’s proprietary runtime agent for distributed automation execution. It supports Web, Desktop UI, and Virtual Desktop automation.
Setup Steps:
-
Select Remote Agent from the Agent type drop-down.
-
Enter a unique Agent name (e.g., “Local Agent”).
- Enter a description if needed. This field is optional and can be used to keep some notes/description about the Agent
-
Specify the hostname.
Note: If the Agent is installed on the same machine as Leapwork Studio, use localhost. Otherwise, specify the IP address, machine name, or DNS name of the remote machine. -
Set the port.
Note: Default port is 6777. Confirm that this port is open on the firewall to ensure connectivity. - Select Authentication Method:
- Windows login – Requires manual login with Windows credentials.
- Windows login - auto – Allows predefined automation users (preferably service accounts) to automatically log in during execution.
- Password – The Agent is protected by a password known only to team members.
-
Choose the screen resolution.
- To record only the selected display, even if multiple screens are available on the agent, check Lock recording on selected screen.
- Select the desired display for execution.
- Select the SAP System Logon.
- Select the Green Screen application type from the available options.
-
Select the proxy configuration method from the following options:
- No proxy: The agent will not use a proxy.
- Automatic detection: The agent will automatically detect proxy settings.
- Automatic from URL: The agent will retrieve proxy settings from a specified URL.
- Manual settings: Manually configure the proxy settings.
- To automatically lock the session after disconnecting from the agent, check Lock session after disconnecting from Agent.
- Test the connection
- Save the configuration.
If the Agent is configured correctly, Leapwork will open a terminal window displaying the host computer's desktop. At this point, you can log in with the Windows account that the Agent should use. This session remains active until the Agent machine is restarted.
Save the configuration to complete the setup. For more details, see Architecture Overview.
Leapwork Cloud Agent
Leapwork offers Cloud Agents as part of its fully managed cloud-based infrastructure. Cloud Agents provide a scalable execution environment without requiring on-premise infrastructure and support web automation.
Cloud Agents support web automation and OCR-based automation using Image and Text Recognition, plus Mouse and Keyboard actions.
Mobile automation can be executed using supported third-party cloud testing providers such as LambdaTest, BrowserStack, and Sauce Labs, when those integrations are configured.
Setup Steps:
To set up a Leapwork Cloud agent, follow these steps:
- Request Cloud Agent activation via the Customer Portal.
- A Customer Success Manager (CSM) will provide the necessary details once the request is approved.
-
Enter a title for the Cloud Agent.
- Enter a description if needed.
-
Select the agent type from the ‘Type’ dropdown and choose Leapwork Cloud Agent.
-
Select the specific Cloud Agent assigned to the customer from the ‘Leapwork Cloud Agent’ dropdown.
-
Select the screen resolution for execution.
- Test the connection.
- Save the configuration.

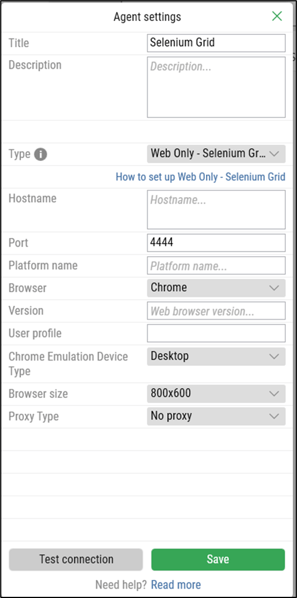
Selenium Grid
Leapwork supports integration with Selenium Grid, allowing users to execute web automation tests across multiple browsers and environments in a distributed setup. Selenium Grid acts as a proxy, distributing automation execution to multiple Selenium nodes instead of using a Leapwork Agent.
Note: Users must configure their own Selenium Grid before adding the agent in Leapwork.
Setup Steps:
To set up a Selenium Grid agent, follow these steps:
- Enter a title for the Selenium Grid Agent.
- Enter a description if needed.
- Enter the hostname as the IP address, machine name, or DNS name of the Selenium Grid Hub.
- Enter the port number, which should match the port specified in the Selenium Grid configuration (default is 4444).
- Enter the platform name if execution is required on a specific platform available in Selenium Grid; otherwise, leave it blank.
- Select the browser from the available dropdown list:
- Chrome
- Firefox
- Edge
- Internet Explorer (IE)
- Safari
- Enter the browser version if execution requires a specific browser version. If left blank, Selenium Grid will use the latest available version.
Note: To test a specific version, ensure it is available on Selenium Grid. If not, leave the field blank to run tests on any available version of the selected browser. - Enter the user profile to be used for browser execution.
- Select the Chrome emulation device type from the available list, which includes desktop and various smartphone models.
- Select the browser size, which determines the screen resolution for execution.
- Select the proxy configuration method:
- No proxy
- Automatic detection
- Automatic from URL
- Manual settings
- Test the connection.
- Save the configuration.
For more details, see Selenium Grid Documentation.
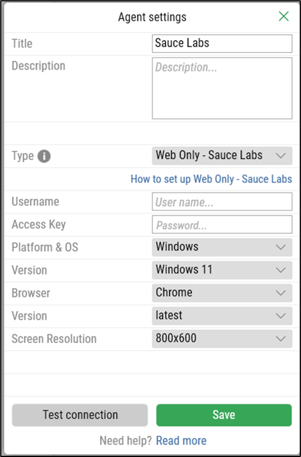
Sauce Labs
Leapwork supports integration with Sauce Labs, a cloud-based testing platform that allows you to run automated web and mobile tests across a wide variety of browsers, operating systems, and devices.
This agent type is ideal when you want to validate cross-browser and cross-platform compatibility without maintaining your own infrastructure. Use it to execute automation flows on real browsers and devices in the cloud—especially useful when testing environments are not available locally.
Note: You must have a valid Sauce Labs account and access credentials before proceeding with the setup.
VIDEO TUTORIAL: Learn how to set up an Agent for Sauce Labs.
Setup Steps:
To set up a Sauce Labs agent, follow these steps:
- Enter a title for the Sauce Labs Agent.
- Enter a description if needed.
- Select the Agent Type as Web Only – Sauce Labs.
- Enter your Sauce Labs username.
- Enter your Sauce Labs access key.
- Select the platform & operating system from the available list.
- Select the platform version.
- Select the browser from the available dropdown list.
- Enter the browser version, or leave it blank to use the latest available version.
Note: In case version info is not available, latest should be chosen as the option. - Select the screen resolution for test execution.
- Test the connection. If the Agent is set up correctly, Leapwork displays a green Successfully connected message.
- Save the configuration.
For more details, see Selenium Grid Documentation.
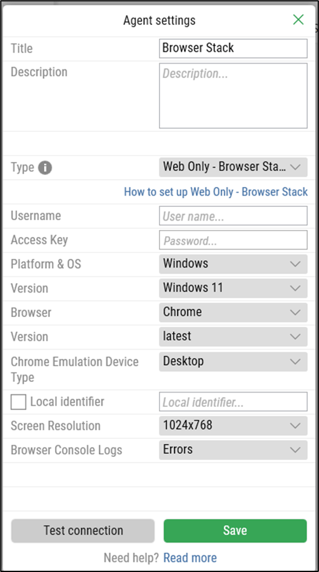
Browser Stack
Leapwork supports integration with BrowserStack, a cloud-based testing platform that enables automated testing across a wide range of browsers, operating systems, and mobile devices.
This agent is ideal when you need to run web tests on real devices and browsers in the cloud, especially for validating cross-browser compatibility and ensuring coverage on systems not available in your local setup.
Note: You must have an active BrowserStack account and access credentials before configuring this agent.
VIDEO TUTORIAL: Learn how to set up an Agent for BrowserStack.
Setup Steps:
To set up a BrowserStack agent, follow these steps:
- Enter a title for the BrowserStack Agent.
- Enter a description if needed.
- Select the Agent Type as Web Only – Browser Stack.
- Enter your BrowserStack username.
- Enter your BrowserStack access key.
- Select the platform & operating system from the available list.
- Select the platform version.
- Select the browser from the available dropdown list:
- Enter the browser version, or leave it blank to use the latest available version.
Note: In case version info is not available, latest should be chosen as the option. - Select the Chrome emulation device if needed, choosing from desktop or a wide variety of smartphones.
-
Enable Local identifier and enter a value in the input field to test a locally hosted application.
Note: This setup uses BrowserStack Local to test internal or private servers, as well as public URLs, through the BrowserStack cloud infrastructure. It supports firewalls, proxies, and Active Directory. - Select the screen resolution for test execution.
- Choose the browser console logs level from the dropdown.
- Test the connection. If the Agent is set up correctly, Leapwork displays a green Successfully connected message.
- Save the configuration.
For more details, see BrowserStack Documentation.
GridLastic
Leapwork supports integration with Gridlastic, a cloud-based Selenium Grid service that enables cross-browser testing across different operating systems and browsers—without needing to maintain your own Selenium infrastructure.
This agent is ideal when you want to run web automation flows in a cloud-hosted Selenium environment while keeping full control over your configurations and test distributions across multiple browsers and OS combinations.
Note: You must have an active Gridlastic account and access credentials before configuring this agent.
Setup Steps:
To set up a Gridlastic agent, follow these steps:
- Enter a title for the Gridlastic Agent.
- Enter a description if needed.
- Select the Agent Type as Web Only – Gridlastic.
- Enter your Gridlastic subdomain.
- Enter the port number (default is 80, but it can be modified if required).
- Enter your Hub username.
- Enter your Hub password.
- Select the platform & operating system from the available list.
- Select the platform version to define where the test will be executed.
- Select the browser from the available dropdown list.
- Enter the browser version, or leave it blank to use the latest available version.
- Select the Chrome emulation device if needed, choosing from desktop or a wide variety of smartphones.
- Select the screen resolution to define how the browser is displayed during test execution.
- Test the connection. If the Agent is set up correctly, Leapwork displays a green Successfully connected message.
- Save the configuration.
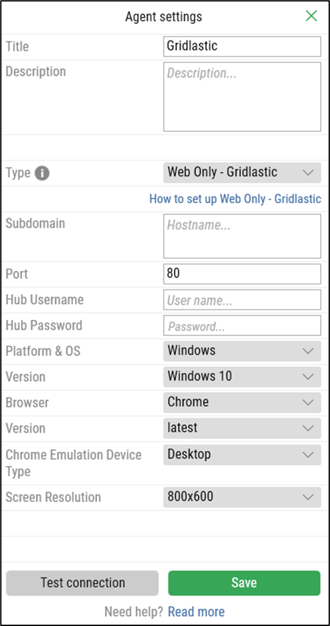
For more information, refer to Gridlastic’s official documentation.
LambdaTest
Leapwork supports integration with LambdaTest, a cloud-based cross-browser testing platform that allows you to automate web application testing across more than 3,000 browsers, operating systems, and real devices.
This agent is ideal when you need to validate how your web application behaves across a broad range of browsers and OS combinations, without managing your own test infrastructure.
Note: You must have an active LambdaTest account and access credentials before configuring this agent.
Setup Steps:
To set up a Gridlastic agent, follow these steps:
- Enter a title for the LambdaTest Agent.
- Enter a description if needed.
- Select the Agent Type as Web Only – LambdaTest.Enter the hostname (IP address, machine name, or DNS name of the LambdaTest hub).
- Enter the port number (default is 80, but can be modified if needed).
- Enter your LambdaTest username.Enter your LambdaTest access key.
- Select the platform & operating system from the available list.
- Select the platform version.
- Enter the browser version, or leave it blank to use the latest available version.
- Select the screen resolution to define how the browser is displayed during execution.
- Enter the custom capabilities in JSON format if required.
Note: Custom capabilities allow you to define advanced execution settings, such as browser options or test metadata, supported by LambdaTest. - Test the connection. If the Agent is set up correctly, Leapwork displays a green Successfully connected message.
- Save the configuration.

Using an agent
Use configured Agents in schedules and preview runs within the Leapwork Automation Platform.
Note:
-
Learn more about using configured Agents in schedules.
-
Learn more about using configured Agents in preview runs.
Reassign Agents Between Teams
Administrators can reassign agents between teams directly from the Agents view, as long as the agent is not currently assigned to a schedule, runlist, or test. This enables more flexible resource management in multi-team environments.

Note: This feature is available starting from Release 2025.2.0, and only for users with admin rights under licenses that support multiple teams.
Created 02.07.25.